The UCD Sonic High Performance Computing (HPC) cluster is a group of high powered servers networked together to tackle large computational tasks. Research IT provides access to High Performance Computing through our Sonic HPC This is a shared campus resource open to all researchers.
For help, advice on getting an account or additional software requirements please see the IT Support Hub
Sonic HPC
| Research IT HPC Cluster | |
|---|---|
| Cluster Name | Sonic |
| Cluster Usage | (opens in a new window)Real Time Information (visible using the staff and research VPNs) |
| No. of Compute Nodes | 53 |
| Total Number of Cores | 1468 (hyperthreading disabled) |
| Processor Speed | 20 nodes with 2 Intel Xeon 6152, 2.1GHz, 22 cores each 4 nodes with 2 Intel Xeon 6140, 2.3Ghz, 18 cores each 24 nodes with 2 Intel E5-2660 v2, 2.2Ghz, 10 cores each 4 nodes with with 2 Intel E5-2620 v2, 2.1Ghz, 6 cores each 1 node with 2 Intel E5-2620 v3, 2,4Ghz 6 cores each |
| Memory per Nodes | 128Gb (24) 256Gb (7) 384 (20) 786 (1) 1.5TB (1) |
| Interconnect | Infiniband QDR 40GBs |
| Home Directory Quota | 50GB |
| Scratch Space | 180TB |
| Additional Nodes Types | MEM2 - High Memory - 765 GB RAM 4 * 2.4GHz (6 cores) MEM3 - High Memory - 1.5TB RAM 3 GPU Servers each with 2 Nvidia Tesla V100 . CPU 2.1Ghz RAM =256GB |
There is no direct access to the new cluster externally . If you have a @ucd.ie email address you can apply for a UCD VPN account using the VPN request form on and access the cluster using this. Please ensure you are logged into UCD Connect to access the form
The following is the hardware spec of the Sonic Cluster. Interconnect between compute and GPU nodes is infiniband. The main computational scratch storage is a parallel file system (BeeGFS) has been implemented across 4 storage servers. login and head nodes complete the infrastructure environment .
Home directories have quotas implemented at 50GB. The parallel storage is 550TB in size and is shared across the cluster. This storage is only for the computational use and not long term storage of data. In order for the cluster to remain online files only than 6 months will be removed off this storage
Highlights of the new Sonic (2025)
GPU Nodes
There are 11 new GPU servers.
8 containing 2 Nvidia L40s and 3 containing 2 Nvidia H100s both types have 512GB of RAM available and are equipped with 2 X Intel Xeon 6542Y (2.9Ghz, 24 Cores).
This bring the total GPU footprint to 23 servers with the older machines types having the following : 9 servers with 2 V100 and 2server with 2 A100 and one server with 1 H100
Compute Nodes
There are 6 new CPU nodes each containing 2 X Intel Xeon Gold 6542Y (2.9Ghz, 24 Cores) and 512GB of ram . There is also 2 new high memory machines containing 2 X Xeon 6542Y (2.9Ghz, 24 Cores) and 2TB of RAM . This bring the total compute footprint to 41 servers and 2008 cores
Scratch Storage , Network and Operation Systems
The scratch storage space is now 550TB , we have added a new Nvidia Infiniband HDR switch which provides 200 Gbps interconnect speed between the scratch storage and the H100 gpu nodes . The Operating System has also been upgraded to Red Hat Enterprise 9
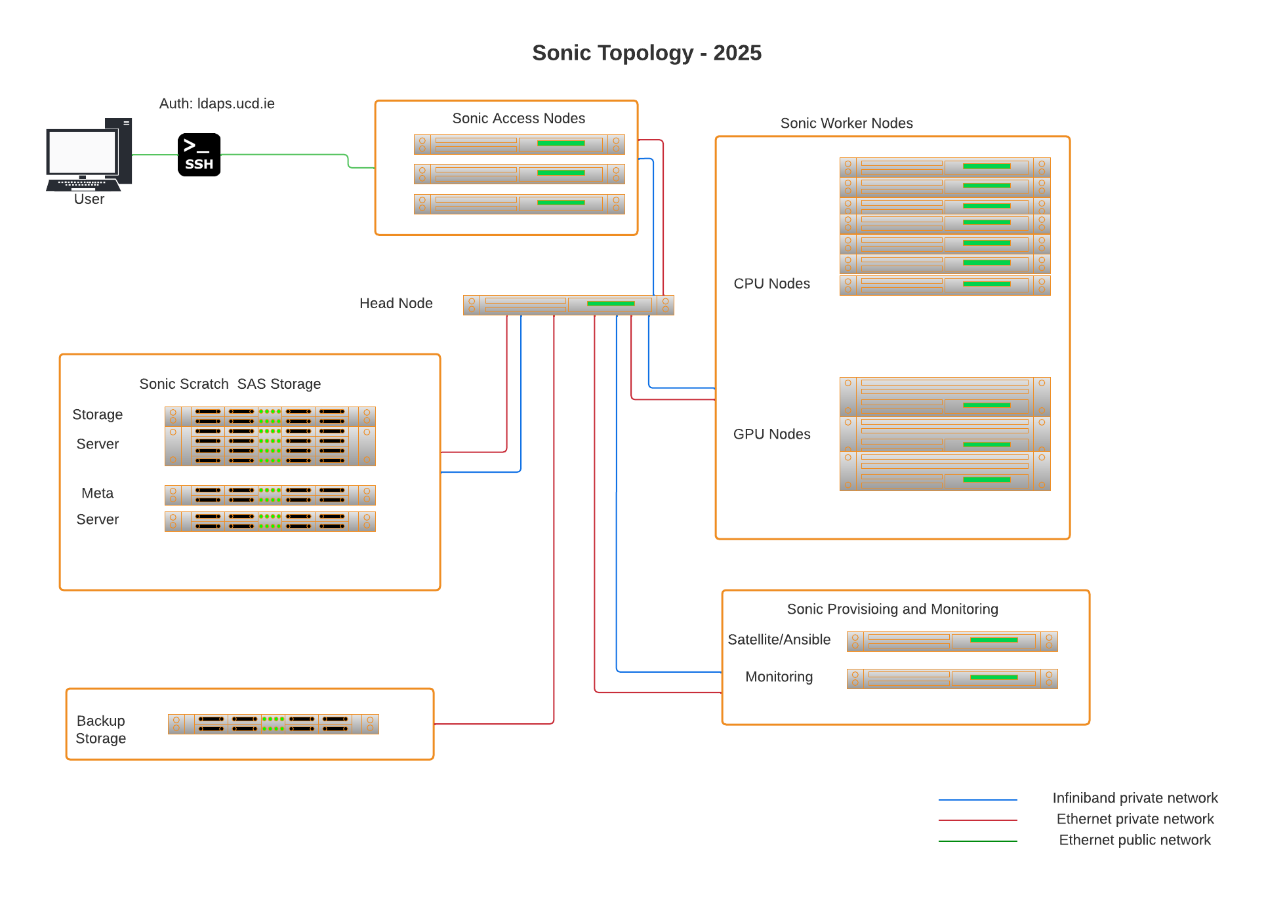
Topology
Below is a topology of the Infrastructure servers on Sonic illustrating both the compute Infiniband network or the Ethernet services network
Below is the specification of all the componet types on Sonic
| GPU Nodes | Manu | Model | CPU/GPU Spec | Mem /GB | |
|---|---|---|---|---|---|
| GPU 1 | Dell | R740XD | 2 X Xeon 6140 (2.3Ghz, 18 Cores) & 2 Nvidia Tesla V100 (32GB) | 256 | |
| GPU 2 | Dell | R740XD | 2 X Xeon 6140 (2.3Ghz, 18 Cores) & 2 Nvidia Tesla V100 (32GB) | 256 | |
| GPU 3 | Dell | R740XD | 2 X Xeon 6140 (2.3Ghz, 18 Cores) & 2 Nvidia Tesla V100 (32GB) | 256 | |
| GPU 4 | Dell | R740 | 2 X Xeon 6240 (2.1Ghz, 18 Cores) & 2 Nvidia Tesla V100 (32GB) | 384 | |
| GPU 5 | Dell | R740 | 2 X Xeon 6240 (2.1Ghz, 18 Cores) & 2 Nvidia Tesla V100 (32GB) | 384 | |
| GPU 6 | Dell | R7525 | 2 X AMD 7452 (2.35GHz, 32 Cores) & 2 Nvidia Tesla A100 (40GB) | 384 | |
| GPU 7 | Dell | R7525 | 2 X AMD 7452 (2.35GHz, 32 Cores) & 2 Nvidia Tesla A100 (40GB) | 384 | |
| GPU 8 | Dell | R750 | 2 X Xeon 6354 (3 Ghz, 18 Cores) & 1 Nvidia H100 | 512 | |
| GPU 9 | Intel | R281-3C2-ZB | 2 X Xeon 6148 ( 2.4Ghz, 20 Cores) & 2 Nvidia V100 | 384 | |
| GPU 10 | Intel | R281-3C2-ZB | 2 X Xeon 6148 ( 2.4Ghz, 20 Cores) & 2 Nvidia V100 | 384 | |
| GPU 11 | Intel | R281-3C2-ZB | 2 X Xeon 6148 ( 2.4Ghz, 20 Cores) & 2 Nvidia V100 | 384 | |
| GPU 12 | Intel | R281-3C2-ZB | 2 X Xeon 6148 ( 2.4Ghz, 20 Cores) & 2 Nvidia V100 | 384 | |
| GPU 13 | Dell | R760 | 2 X Xeon 6542Y (2.9Ghz, 24 Cores) & 2 Nvidia L40s | 512 | |
| GPU 14 | Dell | R760 | 2 X Xeon 6542Y (2.9Ghz, 24 Cores) & 2 Nvidia L40s | 512 | |
| GPU 15 | Dell | R760 | 2 X Xeon 6542Y (2.9Ghz, 24 Cores) & 2 Nvidia L40s | 512 | |
| GPU 16 | Dell | R760 | 2 X Xeon 6542Y (2.9Ghz, 24 Cores) & 2 Nvidia L40s | 512 | |
| GPU 17 | Dell | R760 | 2 X Xeon 6542Y (2.9Ghz, 24 Cores) & 2 Nvidia L40s | 512 | |
| GPU 18 | Dell | R760 | 2 X Xeon 6542Y (2.9Ghz, 24 Cores) & 2 Nvidia L40s | 512 | |
| GPU 19 | Dell | R760 | 2 X Xeon 6542Y (2.9Ghz, 24 Cores) & 2 Nvidia L40s | 512 | |
| GPU 20 | Dell | R760 | 2 X Xeon 6542Y (2.9Ghz, 24 Cores) & 2 Nvidia L40s | 512 | |
| GPU 21 | Dell | R760XA | 2 X Xeon 6542Y (2.9Ghz, 24 Cores) & 2 Nvidia H100 | 512 | |
| GPU 22 | Dell | R760XA | 2 X Xeon 6542Y (2.9Ghz, 24 Cores) & 2 Nvidia H100 | 512 | |
| GPU 23 | Dell | R760XA | 2 X Xeon 6542Y (2.9Ghz, 24 Cores) & 2 Nvidia H100 | 512 | |
| High Memory Servers | Manu | Model | CPU Spec | Memory/TB | |
| Mem 1 | Dell | R640 | 2 X Intel Xeon 6140 (2.3Ghz, 18 Cores) | 1.5 | |
| Mem 2 | Dell | R660 | 2 X Xeon 6542Y (2.9Ghz, 24 Cores) | 2 | |
| Mem 3 | Dell | R660 | 2 X Xeon 6542Y (2.9Ghz, 24 Cores) | 2 | |
| Compute Nodes | Manu | Model | CPU Spec | Memory/TB | |
| Sonic 43 - Sonic 62 (20 nodes ) | Dell | R640 | 2 X Intel Xeon Gold 6152 (2.1GHz, 22 cores) | 384 | |
| Sonic 63 - Sonic 74 (12 nodes) | Dell | R640 | 2 X Intel Xeon Gold 6252 (2.1Ghz, 24 cores) | 384 | |
| Sonic 75 - Sonic 80 (6 nodes) | Dell | R660 | 2 X Intel Xeon Gold 6542Y (2.9Ghz, 24 Cores) | 512 | |
| Infra Nodes | Manu | Model | CPU Spec | Memory /GB | |
| Login Nodes (X 2) | Dell | R660 | 2 X Intel Xeon Gold 6542Y (2.9Ghz, 24 Cores) | 512 | |
| Head Node | Dell | R750 | 2 X Intel Xeon Gold 6342 (2.8Hhz, 24 Cores) | 24 X 2 TB 10K RPM SAS 12Gbp + 2 X 2TB NVMe | 512 |
| Storage Nodes | Manu | Model | CPU Spec | Hard Drive Spec | Memory/GB |
| Storage 1 | Dell | R660 + ME5084 | 2 X Intel Xeon Gold 6542Y (2.9Ghz, 24 Cores) | 84 X 2.4TB 10k RPM SAS | 512 |
| Storage 2 | Dell | R660 + ME5084 | 2 X Intel Xeon Gold 6542Y (2.9Ghz, 24 Cores) | 84 X 2.4TB 10k RPM SAS | 512 |
| MetaData 1 | Dell | R660 + ME5084 | 2 X Intel Xeon Gold 6542Y (2.9Ghz, 24 Cores) | 84 X 2.4TB 10k RPM SAS + 2 X 2TB NVMe | 512 |
| MetaData 2 | Dell | R660 + ME5084 | 2 X Intel Xeon Gold 6542Y (2.9Ghz, 24 Cores) | 284 X 2.4TB 10k RPM SAS + 2 X 2TB NVMe | 512 |
UCD IT Services
Computer Centre, University College Dublin, Belfield, Dublin 4, Ireland.Contact us via the UCD IT Support Hub: www.ucd.ie/ithelp