
Effective use of Breakout Rooms
During virtual classroom sessions zoom breakout rooms can facilitate a synchronous space to engage students in collaborative and active-learning activities. Similar to all types of group work, breakout rooms are most effective when they are structured and students are given explicit instructions on how best to engage. This resource aims to provide lecturers and tutors with guidance on how to manage zoom breakout rooms effectively so students will engage in focused and productive learning activities. It outlines a series of practical considerations which are presented, before, during and after a breakout session.
Use of Breakout Rooms
Breakout rooms are typically used to;
- Facilitate interaction between students - use ice-breaker activities so they can get to know one another; can socially connect with one another and chat or catch up with each other.
- Divide students into smaller groups - working in smaller groups can foster social connection and assist in the creation of a learning community; useful when teaching large classes, when the possibility of student contributions is more limited.
- Engage students in various group activities - brainstorming, discussion, collaborative writing, working in pairs, problem based learning, group presentations and projects.
If appropriate to your virtual classroom sessions and the overall module learning outcomes you may want to establish a routine where students know that breakout rooms will be a consistent part of learning online. Refer to an earlier section of this resource for a more general overview of preparing to teach via zoom.
Before a Breakout Room Session
Once you decide that breakout rooms are appropriate in assisting to achieve the session objectives, the following may be useful to consider prior to conducting the breakout room activity.
Design & Planning:
- Consider the type of activity, time you have available in the session to conduct it, the size of your cohort, the size of breakout groups. The breakout group size should ideally be between two and six to ensure everyone has an opportunity to contribute.
- Think about your role in the activity - what you will do while students are engaging with each other in the breakout rooms to ensure students are keeping on task i.e. visit each breakout room, monitor the collaborative document students are working on or remain available in the main room if anything needs clarification.
- Give students a clear task - share the purpose of the activity, making clear connections to the learning outcomes. The benefits of undertaking breakout room activities should be tangible for students. Determine the activity instructions that you will provide with students in advance including what they will need to produce or share back. Prior to the breakout room activity it can also be useful to get students to complete a short exercise individually that is linked to the group task so they are prepared to share their ideas.
- Consider assigning roles to group members to help with completion of activity - i.e. note taker, timekeeper and summariser (who presents on behalf of their group once the breakout room ends).
- Share any links or files through the chat in the mainroom before you move students as they will not have access to the mainroom chat once they enter the breakout rooms.
- Consider if you need to provide a link or instructions to students on how to use collaborative tools - i.e. google document/google slides, google jamboard, padlet etc for groups to work together on to produce and share back an output. You can also designate one student to share their screen with a document or a whiteboard in a breakout room, and students can annotate together.
- Before moving students to the breakout room, always check with students they understand what is required - allow some time for them to ask questions about the activity.
Setup Breakout Rooms in Zoom:
When logged into your UCD Zoom account enable breakout rooms(figure 1); in your general settings under ‘meetings advanced’ (as shown below). This ensures that everytime you set up a zoom session you will have the option to use breakout rooms if required.

Figure 1: Breakout room assign screen
When setting up breakout rooms consider what will work best for the activity you have prepared, lecturers (i.e. hosts) have various options to;
- assign students automatically to breakout rooms (this is recommended for activities that do not involve pre-arranged groupings as students are assigned randomly)
- to assign students manually (this is recommended for activities that involve predetermined groups, i.e. keeping students in the same group for module group projects).
- let the students self select by selecting the option ‘let participants choose room’
You can also set up breakout groups in advance by pre-assigning them, for further guidance see Pre-Assigning Breakout Groups in the Virtual Classroom (Zoom) using the Classlist in Brightspace
Before you start/open all breakout rooms, review your breakout rooms options or settings (as shown below in figure 2);
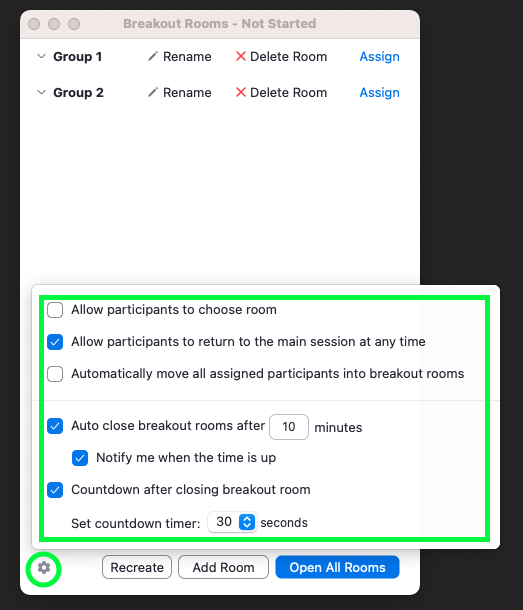
Figure 2: Breakout room options
You can choose the settings options to;
- allow students return to the main room at any time during the breakout rooms session
- automatically move all assigned participants to breakout rooms this means when you create the breakout rooms students will not receive an invite to join the breakout room but will instead be automatically assigned.
- automatically close breakout rooms after a specified amount of time, a countdown timer will be visible to all in the breakout room.
- set a countdown timer for students from 15 seconds to 2 minutes which is visible to all in the room.
- You can also set the setting that all participants can share the screen so a spokesperson from some or all groups can share their screen when they return to the big room.
Once you are satisfied with your selected settings, you need to click ‘Open All Rooms’ and breakout rooms will start. You will be able to see which students have joined which breakout room.
During a Breakout Room Session
Once the breakout rooms are in progress you can observe and engage with students in various ways as follows;
Visit breakout room
You can move between breakout rooms to clarify or monitor a task or to stimulate group discussions, to check progress or gauge understanding. Click ‘join’ to move to a specific breakout room (figure 3). Students in a breakout room can use the ‘ask for help’ option within their breakout rooms (figure 4); this allows them to indicate to the lecturer/tutor (host/co host) that they have a question. You will receive an alert with a pop-up box on your screen which you can select to join the requesting breakout room immediately or decline and visit that breakout room later.
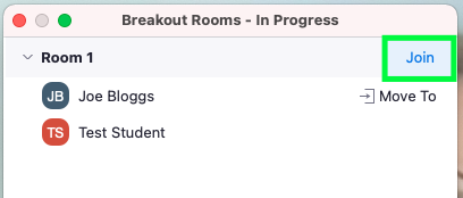
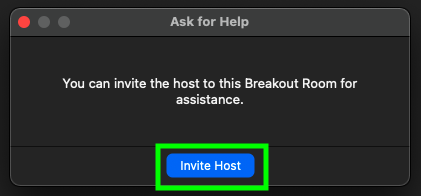
Figure 3: Join Breakout room Figure 4: Ask for help in Breakout room
Communicate with students
You can broadcast a message to all breakout rooms at the same time by broadcasting a message to all breakout rooms. This ideal to keep students on task or share any helpful reminders or information they require for task completion. The message will pop up on students’ screens and stay for a few seconds after you send it.
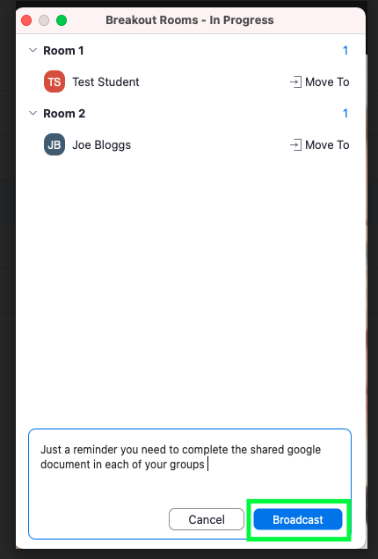
Figure 5: Broadcast message
Collaborative workspace
Tools such as google document/slide, jamboard, padlet etc can provide an accessible space for each group's responses and allows students to contribute to a single document. As students work together, you can monitor (without visiting the breakout rooms) the collaborative inputs in real time. In order for students to share you need to give students the option to screen share via the advanced sharing options as shown below.
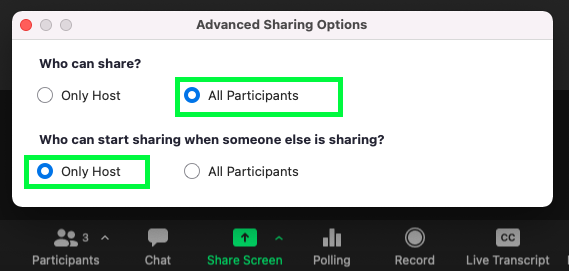
Figure 6: Advanced sharing options
Use a timer
You can select from the breakout rooms settings to ‘auto close breakout rooms after ‘x’ minutes’ this way students are aware of the time remaining for their activity alternatively you can notify students of the time remaining in the breakout rooms (via broadcast message).
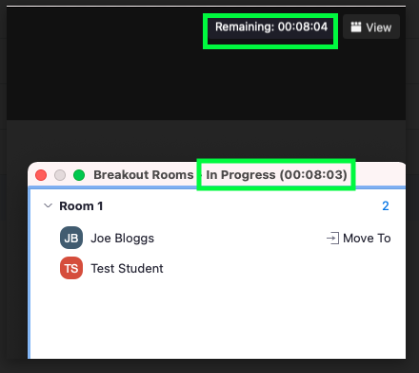
Figure 7: Breakout room timer
After a Breakout Room Session
Once a breakout room session has ended, ideally, students should be asked to report to the main meeting room by giving feedback, summarising their discussion or presenting their work. This can be facilitated in a number of ways:
- Verbal Response - in the main room, one member from each breakout room shares verbally (using mic/camera) with the lecturer and the rest of the class the key points from their group activity. Students should be guided on what they need to share and how much time they will have to do this.
- Collaborative Documents/Tools/Whiteboard - in the main room, one member from each group could share (via screen share/share a file) the document/presentation with the outputs of the group activity. Or if students have used the whiteboard for brainstorming or collating ideas they could share the saved whiteboard either.
- Summarise - in the main room once the breakout room activity has ended and students have shared their contributions as the lecturer you can use summarising techniques to wrap up the key points/themes that have emerged from the breakout room activity and/or give feedback on presentations and ideas. If discussion points need elaboration, you can guide students towards module learning materials (sharing via Brightspace) that can add depth to their understandings and responses.
- Evaluate Students’ Experience - finally, if you plan to use breakout rooms consistently during the course of a module/programme, it’s important to find out what students’ experience was like so you know what adjustments or supports you need to put into place for subsequent breakout sessions. It is advisable to gather some feedback from students to see if they are seeing the purpose and benefits from participating in breakout rooms.