What is an affinity diagram used for?
An affinity diagram is a tool that gathers large amounts of language data (ideas, opinions, issues) and organises them into groupings based on their natural relationships.
The affinity process is often used to group ideas generated by brainstorming. Doing the activity in silence ensures that all opinions are brought forward.
Why should someone use it?
An affinity diagram is useful anywhere a group needs to generate and organise a large amount of information. For example:
a leadership team may use the diagram during strategic planning to organise their thoughts and ideas
an improvement team may use the diagram to analyse the common causes of a problem in a process
This tool is great for:
- gathering and organising ideas from a large and diverse group
- organising a large volume of ideas that may otherwise be overwhelming
- helping a group to make connections between ideas, or to identify recurring themes, that might not seem obvious at first
- helping a group to reach consensus by organising ideas into clearer, easy to understand themes
- helping a group to move beyond habitual thinking and preconceived ideas
Directions on how to use it
Step 1: Pose a single clear question to the group and give clear instructions
Make sure that everyone understands what is being asked of them. Perhaps you are looking for ideas or examples of something. Tell the group either how many ideas you are looking for, or how long they have to keep producing ideas. If you expect it to be challenging to come up with many ideas – or you need to limit the amount of ideas that are produced, you may ask for 5 from each participant. If you want to produce as many ideas as possible you may ask the participants to keep adding ideas for 3 minutes.
Being very clear upfront will ensure that the work to follow produces valuable outputs.
Step 2: Record the ideas, one per post-it, in silence
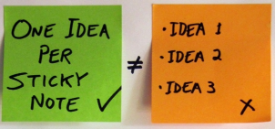

Each member of the group should begin to record their ideas on post-it notes. Ideas should be recorded one per post-it, writing in marker and in all-caps. The reason for this approach is that it makes it easy for ideas to be moved around and read by participants, as well as making it easy to read the ideas once they are photographed at the end of the session.
Doing this part of the activity in silence means that everyone puts down all of their own ideas – including those that are duplicates of the ideas other people have.
Step 3: Ask participants to silently move post-its around so they form groups of similar items
Participants should look for ideas that are similar or seem to be related in some way and place them next to each other, repeating the process until all post-its are part of a group (there may be ‘groups’ of 1 – this is ok).
If a participant wants to move someone else’s post-it or change an already moved post-it to a different group, this is fine but should be done silently. The other person may agree with the change! If an idea belongs to two groups, a duplicate post-it can be made.
Step 4: The discussion
Once the groups have been defined it is time to discuss the result as a group. You may have noticed a surprising pattern or reccurring theme. If there is disagreement about where a post-it belongs, now is the time to discuss and make any final changes.
Step 5: Give each group a heading
Finally, it is time to give each group a name that captures its meaning based on the collection of ideas inside it. You now have the groups collective insight into the question you posed at the start.
What now?
Now you can use the information you have collected from the group.
Contact (opens in a new window)agile@ucd.ie for support on using tools such as this and others.
Published on 13 February 2020